

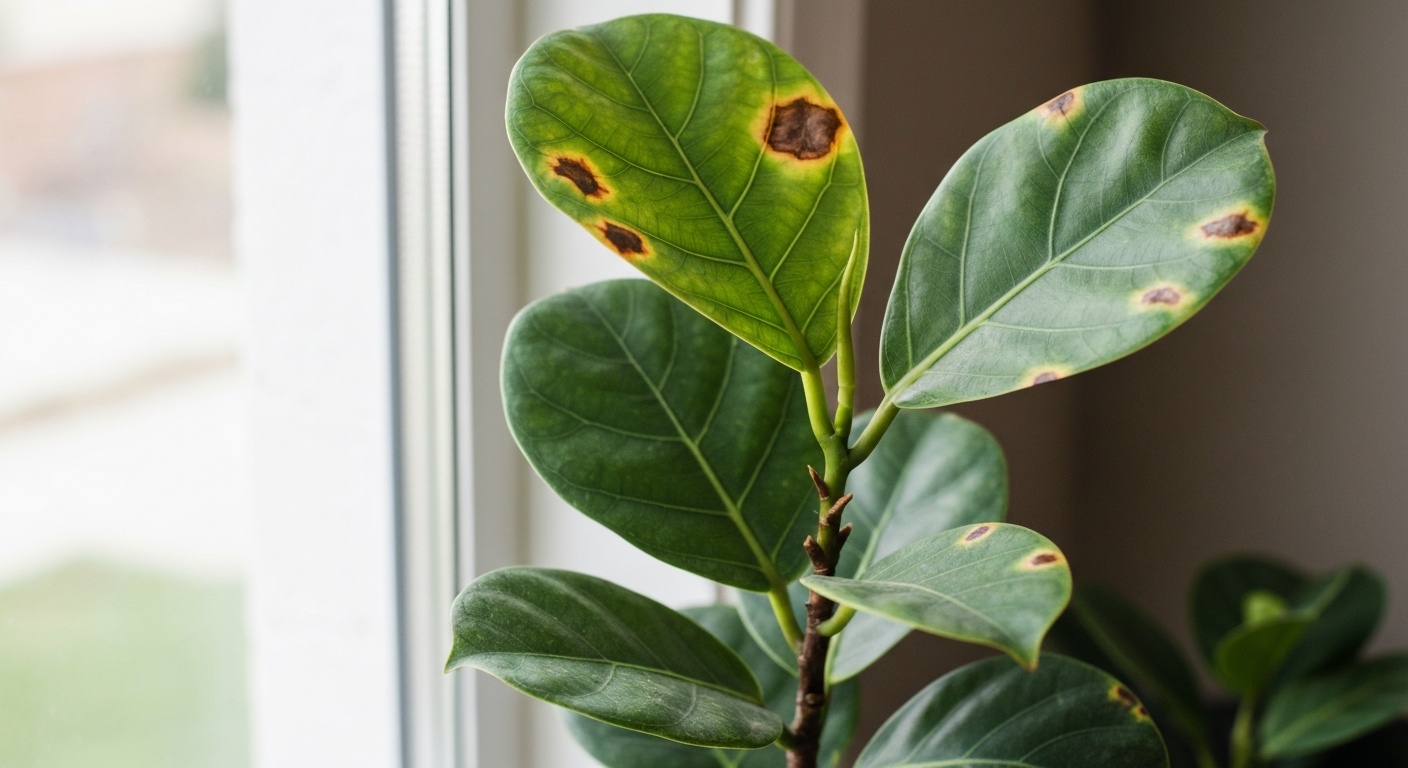
Fiddle leaf figs (Ficus lyrata) are undeniably stunning houseplants, celebrated for their dramatic, large, violin-shaped leaves. They bring a touch of the tropics indoors, but like any prized possession, they require specific care to truly flourish. One of the most common and perplexing issues faced by fiddle leaf fig owners is the sudden appearance of fiddle leaf fig brown spots. These unsightly blemishes can range from tiny specks to large, spreading patches, often causing alarm and confusion. Understanding why these spots appear is the first crucial step toward restoring your plant’s vibrant health and preventing future issues.
This comprehensive guide will walk you through the various causes of brown spots, how to accurately diagnose the problem, effective treatment strategies, and proactive prevention methods to keep your fiddle leaf fig looking its absolute best.
Understanding Fiddle Leaf Fig Brown Spots: A Common Concern
Brown spots on your fiddle leaf fig are like a cry for help from your plant. They indicate that something in its environment or care routine is amiss. Because fiddle leaf figs are native to tropical rainforests, they have specific needs regarding light, water, and humidity that, when not met, can quickly manifest as stress symptoms on their leaves. The good news is that most causes of brown spots are entirely treatable and preventable once you know what to look for.
Key Symptoms to Look For
Before you can treat the problem, you need to accurately identify the specific type of brown spots your fiddle leaf fig is exhibiting. Different appearances often point to different underlying issues.
- Crispy, Dry Brown Spots on Leaf Edges or Tips: This often suggests underwatering or a lack of humidity. The leaves might feel brittle to the touch.
- Large, Dark Brown or Black, Mushy Spots (often with a yellow halo): This is a classic sign of overwatering and potential root rot. These spots tend to appear more towards the center or lower parts of the plant and feel soft.
- Small, Scattered Brown Spots or Patches: Could indicate pest activity, fungal/bacterial leaf spots, or even general environmental stress.
- Light Brown or Bleached Spots on Leaves Exposed to Sun: This is a clear indicator of sunburn. The affected areas will look parched and often appear on leaves facing a window.
- Brown Spots on New Leaves: Can point to nutrient deficiencies, inconsistent watering, or sudden environmental changes.
- Brown Spots Accompanied by Sticky Residue or Tiny Webs: Definitive signs of pest infestation.
Observing the location, texture, and accompanying symptoms will be vital in narrowing down the potential culprits.
Primary Causes of Fiddle Leaf Fig Brown Spots
Identifying the root cause is paramount. Here are the most common reasons your fiddle leaf fig might develop brown spots:
1. Overwatering and Root Rot
This is arguably the number one killer of fiddle leaf figs and the most common cause of dark, mushy brown spots. Fiddle leaf figs hate having “wet feet.” When the soil stays saturated for too long, the roots are deprived of oxygen and begin to rot.
- Symptoms: Large, dark brown to black spots, often near the center or base of leaves. Leaves may also turn yellow and drop. The soil will remain damp for extended periods.
- Why it happens: Too frequent watering, poor drainage in the pot, or heavy, non-aerated potting mix.
2. Underwatering and Dehydration
While overwatering is common, underwatering can also cause brown spots, though they typically appear differently.
- Symptoms: Crispy, dry brown spots, usually starting at the leaf edges or tips. The entire leaf may curl inwards or feel brittle. The soil dries out very quickly.
- Why it happens: Forgetting to water, not watering thoroughly enough, or the plant being root-bound in a small pot.
3. Low Humidity
Fiddle leaf figs are tropical plants, accustomed to high humidity. Indoor environments, especially during winter with heating systems running, can be incredibly dry.
- Symptoms: Brown, crispy edges and tips, similar to underwatering, but the soil might be consistently moist.
- Why it happens: Dry air, often exacerbated by proximity to vents or heaters.
4. Sunburn (Leaf Scorch)
Despite their love for bright light, direct, intense sunlight can be too much, especially for plants accustomed to indirect light.
- Symptoms: Light brown or bleached patches on leaves directly exposed to the sun, often appearing crispy.
- Why it happens: Placing the plant in a window with unfiltered, harsh afternoon sun.
5. Pests Infestations
Sap-sucking pests can stress the plant, leading to discoloration and brown spots.
- Symptoms: Small, scattered brown or yellow spots, often accompanied by visible pests (spider mites, mealybugs, thrips), sticky residue (honeydew), or fine webbing (spider mites).
- Why it happens: Pests are introduced from new plants, open windows, or simply find your plant appealing.
6. Nutrient Deficiencies
While less common than watering issues, a lack of essential nutrients can weaken the plant and make it susceptible to problems.
- Symptoms: General yellowing, stunted growth, or specific patterns of brown spots depending on the nutrient.
- Why it happens: Infrequent fertilization or incorrect soil pH preventing nutrient uptake.
7. Fungal and Bacterial Leaf Spot Diseases
These pathogens can cause distinct brown spots, often with characteristic halos.
- Symptoms: Circular or irregular brown spots, sometimes with a yellow halo, that can spread. May feel slightly sunken or raised. Can be mistaken for watering issues, but often have a more defined, spreading pattern. For more information, see our article on leaf spot disease.
- Why it happens: High humidity combined with poor air circulation, or water sitting on leaves for too long, creating an ideal environment for pathogens.
8. Acclimation Stress or Transplant Shock
Fiddle leaf figs are notoriously dramatic. Any sudden change in their environment or being moved to a new home can cause stress.
- Symptoms: Dropping leaves, general wilting, or brown spots appearing a few weeks after a move or repotting.
- Why it happens: Sudden changes in light, temperature, humidity, or root disturbance during repotting.
Diagnosing the Problem: A Step-by-Step Approach
Accurate diagnosis is crucial. Don’t jump to conclusions; carefully examine your plant and its environment. If you have a sick plant, a methodical approach is best.
-
Review Your Watering Habits:
- How often do you water? Do you check the soil moisture first?
- Does water drain freely from the bottom of the pot? Is there a saucer catching standing water?
- If soil is constantly wet and smells foul, suspect root rot.
- If soil dries out quickly and stays bone dry, suspect underwatering.
-
Inspect the Environment:
- Light: Is your plant getting bright, indirect light? Is it in direct, harsh sun for extended periods?
- Humidity: Is the air very dry in your home, especially near vents or heaters?
- Temperature: Are there sudden drafts or extreme temperature fluctuations?
-
Examine the Leaves Closely:
- Location of spots: Edges, center, new growth, old growth?
- Texture: Crispy, mushy, dry, soft?
- Color: Light brown, dark brown, black, yellow halo?
- Undersides of leaves: Check for pests, sticky residue, or webbing. Use a magnifying glass if necessary.
-
Check the Soil and Roots:
- Gently pull the plant from its pot (if possible) to inspect the roots.
- Healthy roots are firm and white or light tan.
- Root rot manifests as soft, brown, or black, mushy roots that often smell foul.
-
Utilize Technology:
- If you’re still unsure, take clear photos of the symptoms on your iPhone and use a plant disease identifier app. Our Plant Disease Identifier app can help you narrow down potential issues by analyzing your plant’s symptoms and offering informed suggestions. Remember, AI tools provide informational guidance, not professional agricultural or medical diagnoses.
By systematically going through these steps, you can often pinpoint the primary cause of your fiddle leaf fig’s brown spots. For a general guide on how to diagnose plant problems, refer to our detailed article.
Treating Fiddle Leaf Fig Brown Spots
Once you’ve identified the cause, implementing the correct treatment is key.
1. Addressing Overwatering and Root Rot
- Act Fast: If you suspect root rot, immediately stop watering.
- Inspect Roots: Gently remove the plant from its pot. Shake off excess soil.
- Prune Damaged Roots: Use clean, sharp shears to cut away any soft, mushy, or black roots. Healthy roots are firm and white.
- Repot: Repot into a clean pot (or cleaned old pot) with fresh, well-draining potting mix specifically designed for Ficus or houseplants. Ensure the pot has drainage holes.
- Adjust Watering: Allow the top 2-3 inches of soil to dry out completely before watering again. When you do water, water thoroughly until it drains from the bottom, then empty any standing water from the saucer.
2. Correcting Underwatering
- Thorough Watering: Water slowly and deeply until water runs out of the drainage holes.
- Consistent Schedule: Establish a more consistent watering schedule, checking the soil moisture every few days. Don’t wait until the leaves start to droop dramatically.
- Consider a Larger Pot: If the plant is root-bound and drying out too quickly, it might be time for a slightly larger pot.
3. Improving Humidity
- Humidifier: Place a small humidifier near your plant.
- Pebble Tray: Place the pot on a pebble tray filled with water (ensure the pot isn’t sitting in the water).
- Grouping Plants: Grouping plants together can create a localized microclimate with higher humidity.
- Avoid Misting (mostly): While misting can temporarily raise humidity, it’s often ineffective long-term and can promote fungal issues if water sits on leaves.
4. Relocating from Harsh Sun
- Move Your Plant: If sunburn is the issue, move your fiddle leaf fig to a location with bright, indirect light. A few feet back from a south-facing window or near an east or west-facing window usually works best.
- Sheer Curtains: Use sheer curtains to filter intense sunlight.
5. Pest Control
- Isolate: Immediately isolate an infested plant to prevent spread.
- Manual Removal: For small infestations, wipe leaves with a damp cloth or cotton swab dipped in rubbing alcohol.
- Insecticidal Soap/Neem Oil: Apply an insecticidal soap or neem oil solution to thoroughly cover all leaf surfaces (top and bottom) and stems. Repeat every 5-7 days for several weeks to break the pest life cycle.
- Shower: For spider mites, a strong spray of water in the shower can dislodge many pests.
6. Addressing Nutrient Deficiencies
- Fertilize: Use a balanced, slow-release houseplant fertilizer during the growing season (spring and summer), following package instructions. Do not over-fertilize, as this can burn roots.
7. Treating Fungal/Bacterial Leaf Spot Diseases
- Improve Airflow: Ensure good air circulation around the plant.
- Water Correctly: Water the soil directly, avoiding getting water on the leaves, especially in the evening.
- Prune Affected Leaves: Remove heavily infected leaves to prevent further spread. Use sterilized shears.
- Fungicides (When Necessary): For severe fungal infections, an organic copper-based fungicide or specific houseplant fungicide may be necessary. Always follow product instructions carefully. Note that fungicides are generally not effective against bacterial spots. For more information on common plant diseases and their treatment, consult our resources.
8. Pruning Affected Leaves
- Why Prune: Severely damaged or fully brown leaves will not recover. Pruning them helps the plant redirect energy to new, healthy growth. It also improves aesthetics and air circulation.
- How to Prune: Use clean, sharp pruning shears. Cut the leaf stem close to the main stem or trunk. Sterilize your shears between cuts, especially if you suspect disease, to prevent spreading pathogens.
Prevention is Key: Keeping Your Fiddle Leaf Fig Healthy
Proactive care is the best defense against brown spots.
- Consistent Watering Schedule: Develop a routine. Check the soil moisture regularly. Water thoroughly when the top 2-3 inches of soil are dry. Don’t just water on a calendar schedule.
- Optimal Light Conditions: Place your plant in a spot that receives bright, indirect light. Rotate it periodically to ensure even growth.
- Humidity Maintenance: Use a humidifier, pebble tray, or group plants to maintain higher ambient humidity.
- Proper Fertilization: Feed your fiddle leaf fig with a balanced liquid fertilizer during its active growing season (spring and summer), following the product’s instructions. Reduce or stop fertilization in fall and winter.
- Regular Inspection: Make it a habit to inspect your plant weekly for any early signs of pests or disease. Catching problems early makes them much easier to treat.
- Good Air Circulation: Ensure your plant isn’t crammed into a corner. Good airflow helps prevent fungal issues.
- Well-Draining Soil and Pot: Always use a pot with drainage holes and a high-quality, well-draining potting mix.
- Avoid Drastic Changes: Fiddle leaf figs dislike being moved. Once you find a spot it likes, try to keep it there. If you must move it, do so gradually.
Common Mistakes Fiddle Leaf Fig Owners Make
Even experienced plant parents can make these common blunders:
- Ignoring Early Signs: A small brown spot today could be a major problem tomorrow. Address issues promptly.
- Over-Fertilizing: More is not always better. Excess fertilizer can burn roots and stress the plant.
- Frequent Repotting: Only repot when necessary (e.g., root-bound, unhealthy soil). Fiddle leaf figs prefer to be slightly root-bound.
- Lack of Consistent Care: These plants thrive on routine. Inconsistent watering, light, or temperature can lead to stress.
- Using the Wrong Potting Mix: Heavy, dense soil retains too much moisture, leading to root rot. Opt for a light, airy mix.
- Not Cleaning Leaves: Dust can accumulate on the large leaves, blocking light absorption and hindering photosynthesis. Wipe leaves gently with a damp cloth every few weeks.
- Assuming All Brown Spots are the Same: As we’ve discussed, the appearance and location of brown spots are critical clues to the underlying problem. Don’t assume all brown spots mean root rot or underwatering.
When to Seek Professional Help (and how our app assists)
While our app and this guide provide extensive information, there might be rare instances where you feel a professional opinion is needed. If you’ve tried multiple treatments without success, or if the problem rapidly worsens despite your best efforts, you might consider consulting a local nursery expert or a horticulturalist.
Remember, tools like the Plant Disease Identifier app are designed to empower you with knowledge and help you make informed decisions about your plant’s health. By understanding common symptoms and causes, you become a more confident and capable plant parent. Our AI-driven analysis provides informational guidance to assist you in diagnosing potential issues, but it does not constitute a professional agricultural diagnosis.
Conclusion
Fiddle leaf fig brown spots are a common challenge, but they are far from a death sentence for your beloved plant. By understanding the various causes—from improper watering and humidity to pests and disease—and meticulously observing your plant’s symptoms, you can accurately diagnose the problem. Armed with this knowledge, you can implement targeted treatments and, more importantly, establish a proactive care routine that prevents these unsightly blemishes from returning. With consistent attention and a little patience, your fiddle leaf fig will once again flaunt its magnificent, healthy green foliage, becoming the stunning centerpiece it was meant to be. Happy gardening!