

As a Senior Plant Care Editor, I’ve seen countless plant ailments, but few are as common and disheartening to hydrangea lovers as hydrangea leaf spot. Those beautiful, lush leaves, the hallmark of a healthy hydrangea, can quickly become speckled with unsightly spots, turning your prized specimen into a plant you might worry is on its last legs. But fear not! Hydrangea leaf spot is a manageable issue, and with the right knowledge and timely action, you can keep your hydrangeas vibrant and blooming beautifully.
This comprehensive guide will walk you through everything you need to know about identifying, treating, and most importantly, preventing leaf spot on your hydrangeas. We’ll explore the various forms this disease can take, delve into its causes, and equip you with practical, gardener-friendly solutions.
What is Hydrangea Leaf Spot? Understanding the Symptoms
The term “hydrangea leaf spot” is a general one, encompassing several different fungal diseases that manifest as spots on hydrangea leaves. While the exact pathogen might vary, the symptoms often share common characteristics. Recognizing these signs early is your first line of defense.
Here’s what to look for:
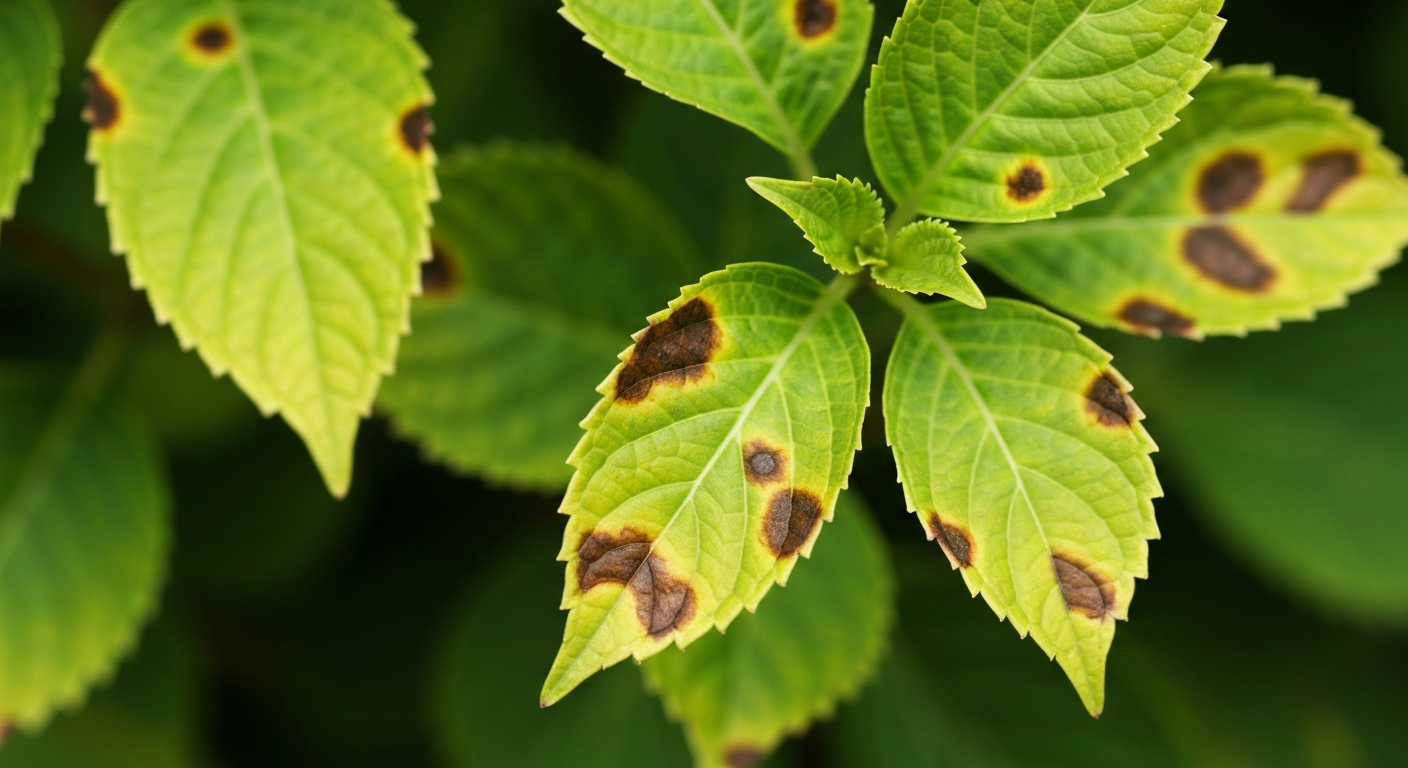
- Small, Circular Spots: Initially, you’ll often see tiny, dark spots, usually brown, black, or reddish-purple. These can appear on any part of the leaf surface.
- Enlarging Lesions: Over time, these spots will grow larger and may merge, creating irregular blotches.
- Halo Effect: Many leaf spots, particularly those caused by Cercospora fungi, will feature a darker center surrounded by a lighter, sometimes yellowish-green halo. This distinct pattern is a key indicator.
- Leaf Discoloration: Severely infected leaves might turn yellow, particularly around the spots, and eventually brown or crisp before dropping prematurely.
- Defoliation: In advanced cases, significant leaf drop can occur, weakening the plant and reducing its vigor and flowering potential.
- Stem Involvement (Less Common): While primarily a leaf disease, severe infections can sometimes extend to petioles and even young stems, though this is less common with typical leaf spot diseases.
It’s important to note that while these symptoms are characteristic of hydrangea leaf spot, other issues like insect damage, nutrient deficiencies, or environmental stress can also cause leaf discoloration or spots. This is why careful diagnosis, perhaps with the help of a tool like the Plant Disease Identifier app on your iPhone, is crucial. You can simply photograph the symptoms with your phone, and the app can offer insights into what might be ailing your plant.
Common Types of Hydrangea Leaf Spot
While the treatment strategies are often similar, knowing the specific fungal culprits can sometimes provide a deeper understanding of the disease’s progression. The most common fungal pathogens causing leaf spots on hydrangeas include:
- Cercospora hydrangeae (Cercospora Leaf Spot): This is arguably the most common and recognizable form. Symptoms typically start as small, reddish-purple spots on lower leaves, often with a distinct purplish-brown center and a lighter tan or gray halo. These spots enlarge and become more circular.
- Phyllosticta hydrangeae (Phyllosticta Leaf Spot): Often presenting as larger, irregular brown spots with darker margins. Sometimes, tiny black dots (pycnidia, the fungal fruiting bodies) can be seen within the spots, especially with a hand lens. These spots might have a somewhat target-like appearance.
- Colletotrichum gloeosporioides (Anthracnose): While more often associated with other plants, anthracnose can affect hydrangeas, causing irregular brown spots, often starting at the leaf margins or tips. In humid conditions, salmon-colored spore masses might be visible.
- Other Fungi: Less common but still possible are leaf spots caused by Alternaria, Septoria, and various other opportunistic fungi.
Regardless of the specific fungus, the underlying conditions that promote their growth are largely the same. This is why a holistic approach to prevention and treatment is often the most effective. For more general information on leaf spot disease across different plants, you can explore our detailed guide.
What Causes Hydrangea Leaf Spot? The Environmental Factors
Fungal leaf spots don’t just appear out of nowhere. They thrive under specific environmental conditions, and understanding these factors is key to both prevention and treatment.
The Perfect Storm for Fungi:
- High Humidity and Moisture: This is the number one culprit. Fungal spores need moisture to germinate and infect plant tissue. Prolonged periods of leaf wetness, whether from rain, overhead irrigation, or heavy dew, create an ideal environment.
- Poor Air Circulation: Dense plantings, overgrown foliage, and lack of air movement prevent leaves from drying quickly after rain or watering. This traps humidity around the plants, extending leaf wetness periods.
- Overhead Watering: Watering your hydrangeas from above, especially in the evening, keeps the foliage wet for longer periods, providing an open invitation for fungal spores.
- Warm Temperatures: Most leaf spot fungi prefer warm, mild temperatures, making late spring through early fall the peak season for outbreaks.
- Stressed Plants: Hydrangeas that are already stressed due to improper watering, poor soil, nutrient deficiencies, or other diseases are more susceptible to infection. A healthy plant has a stronger natural defense.
- Infected Debris: Fungal spores can overwinter on fallen leaves and plant debris. If these are not cleaned up, they serve as a source of inoculum for the following growing season.
Understanding these factors allows you to proactively modify your gardening practices to make your environment less hospitable to these fungal pathogens.
Diagnosing Hydrangea Leaf Spot: A Step-by-Step Approach
Accurate diagnosis is the foundation of effective treatment. While the Plant Disease Identifier app can be a great starting point, a keen eye and systematic approach will further refine your understanding. If your hydrangea is looking like a sick plant, here’s how to investigate:
- Observe Closely: Get up close and personal with your hydrangea. Examine both the top and underside of the leaves. Note the size, shape, color, and distribution of the spots. Are they uniform? Do they have a halo? Are they concentrated on lower leaves or spread throughout?
- Check for Other Pests/Diseases: Sometimes, what looks like leaf spot might be something else entirely. Look for signs of insects (tiny bugs, webbing, chew marks) or other diseases like powdery mildew on plants (a white, powdery coating).
- Consider Environmental Factors: Think about recent weather. Has it been particularly wet or humid? Have you been watering overhead? Is your plant in a shady, poorly ventilated spot? These clues help confirm a fungal diagnosis.
- Use a Diagnostic Tool: As mentioned, taking a picture and using the Plant Disease Identifier app can give you an instant assessment and potential solutions. It’s like having a plant expert in your pocket, helping you to diagnose plant problems quickly.
- Compare with Reliable Resources: Cross-reference your observations with images and descriptions from reputable gardening websites or university extension services. Pay attention to specific details like the “halo effect” for Cercospora.
- Rule Out Non-Fungal Issues:
- Sun Scorch: Irregular brown patches, often on leaves exposed to intense sun, especially after a period of cloudy weather.
- Nutrient Deficiencies: Yellowing (chlorosis) or browning that follows specific patterns (e.g., interveinal chlorosis for iron deficiency).
- Water Stress: Wilting, followed by browning leaf edges or entire leaves.
- Chemical Burn: Irregular brown spots or scorched edges after pesticide or fertilizer application.
- For more on general brown spots on plant leaves, check out our detailed article.
Remember, the app is an informational tool. If you’re dealing with a widespread, severe issue, or if you suspect something more serious, consulting with a local agricultural extension office or a certified arborist/horticulturist is always a good idea. They can offer professional diagnosis and tailored advice.
Treatment Strategies for Hydrangea Leaf Spot
Once you’ve confirmed hydrangea leaf spot, it’s time to act. Treatment involves a combination of cultural practices, organic solutions, and, in some cases, fungicides.
1. Cultural Practices (The Foundation of Treatment)
These are essential steps that should be implemented regardless of whether you use sprays. They address the root causes of fungal growth.
- Sanitation is Key:
- Remove Infected Leaves: As soon as you spot infected leaves, carefully remove them. Do not compost them, as fungal spores can survive and re-infect. Bag and discard them or burn them if allowed in your area.
- Clean Up Debris: At the end of the growing season, meticulously clean up all fallen leaves and plant debris from around your hydrangeas. This removes overwintering spores.
- Sterilize Tools: Always clean and sterilize your pruning shears and other tools, especially after working on an infected plant, to prevent spreading spores to healthy plants. A 10% bleach solution or rubbing alcohol works well.
- Improve Air Circulation:
- Pruning: Prune your hydrangeas to open up the canopy. Remove any crossing, weak, or inward-growing branches to allow better airflow. Do this during dormancy or early spring to minimize stress.
- Spacing: Ensure plants are adequately spaced according to their mature size. Overcrowding is a major contributor to poor air circulation and humidity.
- Proper Watering:
- Water at the Base: Always water your hydrangeas at the soil level, directly around the root zone. Avoid overhead watering that wets the leaves.
- Morning Watering: If you must water overhead, do it in the morning so the leaves have ample time to dry before evening.
- Deep, Infrequent Watering: Encourage deep root growth by watering deeply but less frequently, rather than shallowly and often.
- Mulch: Apply a layer of organic mulch (e.g., shredded bark, compost) around the base of your hydrangeas. This helps conserve soil moisture, regulate soil temperature, and prevents soil-borne spores from splashing up onto lower leaves during rain or watering.
2. Organic and Low-Impact Solutions
For mild to moderate infections, or as a preventative measure, several organic options can be effective.
- Neem Oil: A natural fungicide and insecticide, neem oil works by disrupting fungal growth and spore germination. Mix according to package directions and spray thoroughly, ensuring coverage of both leaf surfaces. Apply every 7-14 days until symptoms subside. It’s best to apply in the evening to avoid harming beneficial insects.
- Baking Soda Spray: While not as potent as commercial fungicides, a homemade baking soda solution can sometimes help with mild cases. Mix 1 tablespoon of baking soda and 1 teaspoon of horticultural oil (or mild liquid soap) into a gallon of water. Spray every 7-10 days. Again, test on a small area first.
- Compost Tea: Some gardeners swear by compost tea as a foliar spray to boost plant immunity and introduce beneficial microbes that can outcompete pathogens.
3. When Fungicides Help
For severe or persistent hydrangea leaf spot infections, especially if cultural practices aren’t enough, fungicides may be necessary.
- Choose the Right Product: Look for fungicides labeled for use on hydrangeas and effective against leaf spot diseases (often containing active ingredients like chlorothalonil, myclobutanil, or propiconazole). Always read and follow the label instructions carefully.
- Timing is Crucial: Fungicides are most effective when applied preventatively or at the very first sign of disease. They protect healthy tissue from infection rather than curing existing spots. Once spots are visible, they can prevent further spread.
- Application: Ensure thorough coverage of all leaf surfaces, top and bottom. Repeat applications as directed on the product label, typically every 7-14 days during periods of high disease pressure.
- Rotate Fungicides: To prevent the development of fungicide resistance, it’s a good practice to alternate between products with different active ingredients if you need to use them frequently.
Important Note: Do not claim medical/agricultural professional diagnosis. Note AI is informational. Always follow product labels.
Prevention is Key: Stopping Leaf Spot Before It Starts
The old adage “an ounce of prevention is worth a pound of cure” is particularly true for fungal diseases like hydrangea leaf spot. By proactively creating an unfavorable environment for fungi, you can significantly reduce the chances of an outbreak.
- Choose Resistant Varieties: When purchasing new hydrangeas, inquire about varieties known for their disease resistance. While no hydrangea is completely immune, some are less susceptible.
- Proper Site Selection: Plant hydrangeas in locations with good air circulation and adequate sunlight (morning sun is ideal, afternoon shade helps prevent scorch). Avoid overly dense, damp areas.
- Adequate Spacing: Give your hydrangeas enough room to grow to their mature size without crowding. This promotes airflow around the foliage, helping leaves dry more quickly.
- Water Wisely:
- Always water at the base of the plant using a soaker hose or drip irrigation.
- Water in the morning to allow foliage to dry completely before nightfall.
- Avoid overhead sprinklers that drench the leaves.
- Maintain Garden Hygiene:
- Regularly remove any fallen leaves or plant debris throughout the growing season.
- Perform a thorough garden cleanup in the fall to remove all potential overwintering spores.
- Sterilize your pruning tools between plants and after each use.
- Prune for Airflow: Annually prune your hydrangeas to remove dead, diseased, or crossing branches that contribute to a dense canopy.
- Healthy Soil and Nutrition: A healthy plant is a resilient plant. Ensure your hydrangeas are planted in well-draining, nutrient-rich soil. Conduct a soil test every few years to identify any deficiencies. Proper fertilization supports strong growth and a robust immune system.
- Mulch Benefits: A 2-4 inch layer of organic mulch helps prevent soil splash, which can carry fungal spores from the soil onto lower leaves.
Implementing these preventative measures will not only protect your hydrangeas from leaf spot but also contribute to their overall health and vigor.
Common Mistakes to Avoid When Dealing with Leaf Spot
Even experienced gardeners can sometimes make missteps. Being aware of these common mistakes can help you navigate hydrangea leaf spot more effectively.
- Ignoring Early Symptoms: Waiting until the disease is widespread makes it much harder to control. Early detection and intervention are crucial. Don’t dismiss those first few spots!
- Overhead Watering: This is perhaps the most common mistake. Continuously wetting the foliage creates the perfect breeding ground for fungi.
- Poor Sanitation: Leaving infected leaves or debris around allows fungal spores to persist and re-infect plants year after year. Composting diseased material is also a no-go.
- Over-Fertilizing with Nitrogen: While hydrangeas need nutrients, excessive nitrogen can promote lush, tender growth that is more susceptible to fungal diseases. A balanced fertilizer is usually best.
- Pruning at the Wrong Time: Pruning during wet weather can inadvertently spread fungal spores. Always prune hydrangeas when the foliage is dry.
- Not Improving Air Circulation: Simply spraying a fungicide without addressing the underlying issue of poor airflow is often a temporary fix. You need to create an environment that discourages fungal growth.
- Misdiagnosis: Treating for leaf spot when the problem is actually root rot, sun scorch, or an insect infestation will be ineffective and could even harm your plant. This is where tools like our plant disease identifier can be a huge asset in getting a more accurate initial assessment.
- Giving Up Too Soon: Fungal diseases often require consistent effort over several weeks or even seasons to bring under control. Patience and persistence are key.
When to Call a Professional
While hydrangea leaf spot is generally something a home gardener can manage, there are situations where professional help might be warranted:
- Widespread or Severe Infection: If the disease is rapidly spreading, affecting a large number of your hydrangeas, or causing significant defoliation despite your best efforts.
- Uncertain Diagnosis: If you’re unsure what’s truly ailing your plant, and the symptoms don’t clearly match leaf spot, a professional can provide an accurate diagnosis.
- High-Value Plants: For particularly cherished or expensive specimens, investing in a professional assessment can be worthwhile.
- Concerns about Chemical Use: If you’re uncomfortable applying fungicides or need advice on specific product selection and safe application.
A local agricultural extension office, a certified arborist, or a professional landscaper with plant pathology expertise can offer tailored advice and, if necessary, recommend stronger treatments or cultural adjustments. Remember, while our app provides valuable information, it does not replace the advice of a certified agricultural professional for complex or severe cases. For more general guidance on plant disease, explore our extensive resources.
Conclusion
Hydrangea leaf spot can be a frustrating challenge, but it is far from a death sentence for your beloved plants. By understanding the symptoms, identifying the causes, and implementing a consistent strategy of cultural practices, organic treatments, and targeted fungicides when necessary, you can effectively manage this common fungal issue.
Remember, a healthy garden is a proactive one. Regular inspection, good sanitation, proper watering, and adequate air circulation are your best defenses. With these practices in place, your hydrangeas will continue to produce those magnificent blooms, adding beauty and charm to your landscape for years to come. Happy gardening!