

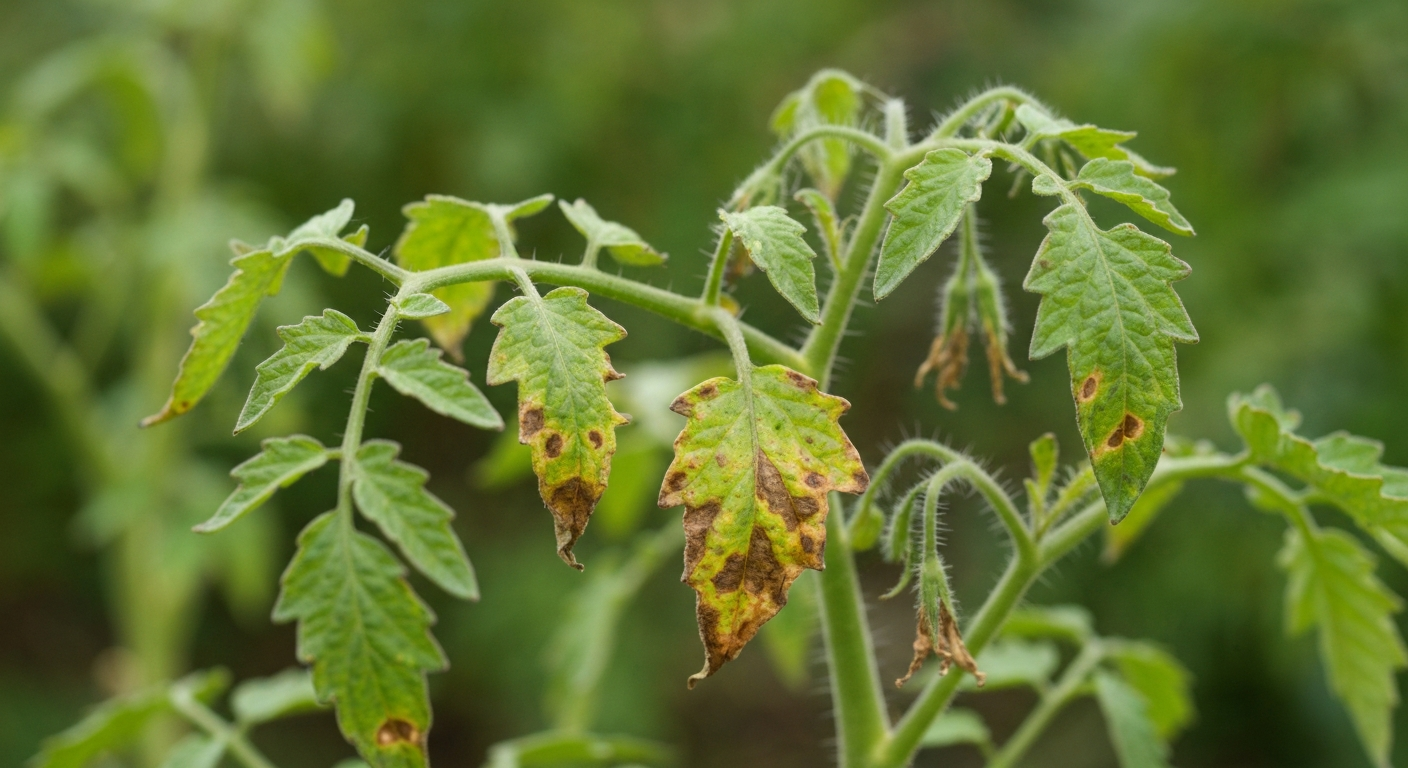
For many home gardeners, the sight of a thriving tomato plant, laden with ripening fruit, is the ultimate reward. But lurking in the shadows, especially during periods of high humidity and rainfall, is a formidable adversary: tomato blight. This group of destructive diseases can quickly turn your dreams of a bountiful harvest into a disheartening struggle. Understanding, identifying, and effectively managing blight is crucial for anyone hoping to enjoy homegrown tomatoes.
As Elena Marsh, Senior Plant Care Editor at plantdiseaseapp.com, my goal is to equip you with the knowledge to combat this common garden woe. This comprehensive guide will walk you through everything you need to know about tomato blight, from recognizing its insidious symptoms to implementing robust prevention and treatment strategies.
What Exactly is Tomato Blight?
The term “tomato blight” is often used broadly by home gardeners, but it primarily refers to two distinct, yet equally devastating, fungal (or oomycete, for Late Blight) diseases: Early Blight and Late Blight. While they share the “blight” moniker and can both wreak havoc on your tomato plants, they are caused by different pathogens, exhibit different symptoms, and thrive under slightly different conditions.
- Early Blight ( Alternaria solani ): This is arguably the most common “blight” encountered by home gardeners. It’s caused by a fungus that typically attacks older, lower leaves first, often appearing earlier in the growing season (hence “early”). It can also affect stems and fruit.
- Late Blight ( Phytophthora infestans ): This is the same notorious pathogen responsible for the Irish potato famine. It is far more aggressive and destructive than Early Blight, capable of wiping out an entire crop in a matter of days under favorable cool, wet conditions. It can affect all parts of the plant, including leaves, stems, and fruit, and spreads rapidly.
While less common, other diseases like Septoria Leaf Spot are sometimes confused with blight due to similar leaf spot symptoms. Knowing the specific characteristics of Early and Late Blight is key to effective management. If you’re struggling to identify what’s ailing your plants, our Plant Disease Identifier iPhone app can be a valuable tool for a quick preliminary diagnosis by simply photographing the symptoms.
Identifying the Enemy: Symptoms of Tomato Blight
Accurate identification is the first step in successful blight management. While both are “blights,” their symptoms have distinct differences.
Early Blight Symptoms
Early Blight typically starts when plants are stressed or after fruit set, usually on the lower, older leaves first.
- Leaf Spots: Look for dark brown to black spots, often 1/4 to 1/2 inch in diameter, on the leaves. A key diagnostic feature is the presence of concentric rings within these spots, resembling a target or bullseye pattern.
- Yellowing: The tissue surrounding the spots may turn yellow. As the spots enlarge and merge, entire leaves can yellow, wither, and drop off.
- Stem Lesions: Dark, sunken lesions with concentric rings can appear on stems, particularly near the soil line (collar rot) or on branches. Severe stem lesions can girdle the stem and kill the plant.
- Fruit Spots: On green or ripe fruit, dark, leathery, sunken spots with concentric rings may develop, usually near the stem end. These spots can become quite large and may allow secondary soft rot organisms to enter.
Late Blight Symptoms
Late Blight is more aggressive and typically emerges during cooler, wet weather, spreading rapidly throughout the plant.
- Leaf Lesions: Large, irregular, water-soaked spots appear on leaves, starting at the tips or edges. These spots quickly turn brown or black.
- Fuzzy Growth: During periods of high humidity, a distinctive white, downy, fungal-like growth can often be seen on the undersides of infected leaves, especially around the margins of the lesions. This is a crucial diagnostic indicator.
- Stem Blight: Dark brown to black lesions develop on stems and petioles, often without distinct concentric rings. These lesions can quickly girdle and kill entire branches or the main stem.
- Fruit Rot: On green or ripe fruit, large, firm, irregular brown blotches appear, often starting at the top or shoulder. The affected areas remain firm but become leathery and may show a greasy appearance. The rot can penetrate deep into the fruit.
Distinguishing Between Early and Late Blight
Here’s a quick comparison to help you differentiate:
| Feature | Early Blight ( Alternaria solani ) | Late Blight ( Phytophthora infestans ) |
|---|---|---|
| Pathogen | Fungus | Oomycete (water mold) |
| Appearance | Dark spots with concentric “target” rings | Large, irregular, water-soaked, quickly blackening spots |
| Location | Often starts on older, lower leaves | Can appear anywhere, spreads rapidly |
| Fuzzy Growth | No | Yes, white, downy growth on undersides of leaves |
| Fruit Symptoms | Sunken, leathery spots with concentric rings | Large, firm, greasy brown blotches |
| Spread Rate | Relatively slow | Extremely rapid, can destroy crops in days |
| Conditions | Warm (75-85°F), humid, wet periods | Cool (60-70°F), very wet and humid periods |
If you’re seeing brown spots on plant leaves or other signs of a sick plant, it’s essential to investigate further. For a broader overview of common tomato ailments, consult our guide on tomato plant diseases.
The Root of the Problem: Causes and Conditions Favoring Blight
Understanding what causes blight and the conditions it thrives in is paramount for prevention.
The Pathogens
- Early Blight: Caused by the fungus Alternaria solani. Spores are typically spread by wind, splashing rain, or garden tools. They can overwinter on infected plant debris in the soil or on weed hosts.
- Late Blight: Caused by the oomycete Phytophthora infestans. This pathogen is notorious for its rapid spread. Spores are primarily spread by wind and splashing water. It can overwinter in infected potato tubers left in the soil or in infected tomato volunteers.
Environmental Factors
Both blights require specific environmental conditions to flourish:
- Moisture: Prolonged periods of leaf wetness (6-8 hours or more) are critical for spore germination and infection. This can come from rain, dew, or overhead irrigation.
- Humidity: High relative humidity (above 90%) creates an ideal environment for the pathogens to thrive and spread.
- Temperature:
- Early Blight: Favors warm temperatures (75-85°F / 24-29°C) combined with humidity.
- Late Blight: Prefers cooler temperatures (60-70°F / 15-21°C) with very high humidity and frequent rainfall. This is why it often appears later in the season or during unseasonably cool, wet summers.
Spread Mechanisms
- Wind: Spores can be carried long distances by wind, especially Late Blight spores.
- Splashing Water: Rain or overhead irrigation can splash spores from infected soil or plant debris onto healthy foliage.
- Contaminated Tools: Pruning shears, stakes, or ties that have touched infected plants can transfer spores to healthy ones.
- Infected Seeds/Transplants: While less common for home gardeners, blight can be introduced via infected seeds or nursery transplants.
- Volunteer Plants/Weeds: Diseased tomato or potato plants left in the garden or certain weeds can harbor the pathogens.
Diagnosing Blight: Your First Line of Defense
Early detection is critical, especially with fast-spreading diseases like Late Blight. Here’s how to approach diagnosis:
- Regular Inspection: Make it a habit to inspect your tomato plants daily, paying close attention to the undersides of leaves and the lower foliage. Look for any unusual spots, yellowing, or wilting. This proactive approach can help you spot issues before they become widespread. For general guidance on how to diagnose plant problems, check out our detailed article.
- Visual Symptom Comparison: Compare the symptoms you observe with detailed descriptions and images of Early and Late Blight. Pay attention to the size, shape, color, and pattern of spots, and whether there’s any fuzzy growth. Our guide on leaf spot disease offers more general information on various leaf spot issues.
- Environmental Context: Consider the recent weather conditions. Has it been warm and humid (favoring Early Blight) or cool and very wet (favoring Late Blight)?
- Use a Plant Disease Identifier App: When in doubt, technology can be a great aid. Take clear, well-lit photos of the affected leaves, stems, or fruit with your iPhone and use the Plant Disease Identifier app. The app’s AI can provide an instant preliminary diagnosis, helping you narrow down the possibilities. Remember, AI tools offer informational guidance, not a professional agricultural diagnosis, but they are incredibly helpful for home gardeners. You can also explore our article on the best plant disease identifier app for more details.
- When to Seek Expert Help: If the disease is rapidly progressing, affecting a large portion of your crop, or if you’re unsure about the diagnosis and potential treatments, contact your local agricultural extension office. They can provide professional advice and may even offer lab testing services.
Treatment Strategies: Battling Blight
Once blight has set in, particularly Late Blight, complete eradication can be challenging. The goal shifts to managing the disease, slowing its spread, and salvaging as much of your harvest as possible.
Cultural Practices and Sanitation
These are your first and most important lines of defense and treatment:
- Pruning Infected Material: Carefully remove any leaves, stems, or fruit showing signs of blight. Use sharp, clean pruning shears.
- Important: Sanitize your tools (e.g., with a 10% bleach solution or rubbing alcohol) between each cut if possible, and certainly between plants, to avoid spreading spores.
- Disposal: Do NOT compost infected plant material. Bag it and dispose of it in the trash to prevent the pathogen from overwintering and reinfecting your garden next season.
- Improve Air Circulation: Prune out lower leaves that touch the soil and any non-fruiting suckers to improve airflow within the plant canopy. This helps leaves dry faster, making them less hospitable to fungal growth.
- Watering Wisely: Switch from overhead irrigation to drip irrigation or hand watering at the base of the plants. Avoid watering late in the day, which leaves foliage wet overnight.
- Mulching: Apply a layer of organic mulch (straw, shredded leaves) around the base of your plants. This prevents soil-borne spores from splashing up onto the lower leaves during rain or watering.
Organic Treatment Options
For home gardeners preferring organic methods, several options can help, especially with Early Blight and as preventative measures.
- Copper-based Fungicides: These are OMRI-listed (Organic Materials Review Institute) and can be effective against both Early and Late Blight. They work as a protectant, forming a barrier on the plant surface. Apply according to package directions, typically before disease onset or at the first sign of symptoms, and reapply after rain.
- Neem Oil: While primarily known for its insecticidal properties, neem oil also has some fungicidal effects. It can help suppress fungal growth and act as a deterrent. Apply as a foliar spray, ensuring thorough coverage.
- Baking Soda Spray (DIY): A mixture of 1 tablespoon baking soda, 1 teaspoon horticultural oil (or mild liquid soap), and 1 gallon of water can sometimes help alter the pH on leaf surfaces, making them less hospitable for fungal spores. This is more of a preventative or very early intervention measure and may not be effective against established blight. Test on a small area first.
Synthetic Fungicides (When to Consider)
For severe outbreaks, particularly of Late Blight, or in areas with consistent blight pressure, synthetic fungicides may be necessary for effective control.
- Consult Local Extension: Always consult your local agricultural extension office for recommendations on specific fungicides approved for home garden use in your region. They can advise on the most effective active ingredients for your specific blight issue.
- Read Labels Carefully: Always follow label instructions precisely regarding mixing ratios, application frequency, safety precautions (e.g., wearing gloves, eye protection), and pre-harvest intervals (PHI). Misapplication can be ineffective or harmful.
- Types of Fungicides:
- Protectants: These need to be applied before infection to prevent spores from germinating (e.g., chlorothalonil, mancozeb). They wash off and need reapplication.
- Systemic Fungicides: These are absorbed by the plant and can offer some curative action and longer protection. However, many systemic options are not available or recommended for home gardeners.
- Rotation of Active Ingredients: If using fungicides, it’s good practice to rotate between different types of fungicides with different active ingredients to prevent pathogens from developing resistance.
It’s important to remember that fungicides are most effective as preventative measures or when applied at the very first sign of disease. They cannot “cure” already infected tissue but can protect new growth and slow the spread. For more general advice on plant disease management, our site offers a wealth of information.
Prevention is Key: Stopping Blight Before It Starts
The old adage “an ounce of prevention is worth a pound of cure” is particularly true for tomato blight. Implementing proactive measures is the most effective way to protect your harvest.
- Choose Resistant Varieties: When purchasing seeds or starts, look for varieties labeled “EB” (Early Blight resistant) or “LB” (Late Blight resistant). While no variety is completely immune, these offer significantly better protection.
- Crop Rotation: Do not plant tomatoes (or potatoes) in the same spot year after year. A 3-4 year rotation is ideal. This helps break the disease cycle by preventing pathogens from building up in the soil. For instance, if you had blight this year, plant something entirely different like beans or corn in that spot next season.
- Proper Spacing and Air Circulation: Plant tomato seedlings at the recommended spacing to allow for good airflow between plants. This helps foliage dry more quickly after rain or irrigation, reducing the conditions favorable for blight. Consider staking or caging plants to keep foliage off the ground and improve circulation.
- Watering Techniques:
- Water at the Base: Always water the soil directly at the base of your plants, avoiding wetting the foliage. Drip irrigation or soaker hoses are excellent for this.
- Morning Watering: If hand-watering, do it in the morning so any accidental splashes on leaves have ample time to dry before evening.
- Mulch Application: Apply a 2-4 inch layer of organic mulch (straw, shredded leaves, wood chips) around your tomato plants. This acts as a barrier, preventing soil-borne fungal spores from splashing up onto the lower leaves during rain or watering.
- Garden Hygiene (Sanitation):
- Remove Debris: Promptly remove and dispose of any fallen leaves or plant debris from the garden. These can harbor blight spores.
- Tool Sanitation: Clean and sanitize your gardening tools, especially pruning shears, after each use, particularly if they’ve been used on potentially diseased plants. A 10% bleach solution or rubbing alcohol works well.
- Weed Control: Keep your garden free of weeds, as some can act as alternate hosts for blight pathogens.
- End-of-Season Cleanup: At the end of the growing season, remove and destroy all tomato (and potato) plant debris. Do not leave it in the garden, and do not compost it.
- Healthy Transplants: Start with strong, healthy, disease-free transplants. Inspect any plants you purchase carefully for signs of disease before bringing them into your garden.
- Avoid Volunteer Plants: If you had blight in a previous year, remove any volunteer tomato or potato plants that sprout up. These can carry over the disease.
For more information on common powdery mildew on plants or black spot on roses, which are other common fungal issues, you’ll find similar principles of prevention and sanitation apply. And for a deeper dive into general tomato diseases or powdery mildew, we have dedicated topic pages.
Common Mistakes to Avoid
Even experienced gardeners can make mistakes that inadvertently invite or exacerbate blight.
- Ignoring Early Symptoms: Waiting until the disease is widespread makes it much harder to control. Regular inspection and prompt action are vital.
- Overhead Watering: This is a major culprit in spreading fungal diseases. Wet foliage creates the perfect environment for spores to germinate and infect.
- Planting Too Closely: While tempting to maximize space, overcrowding reduces air circulation, keeps foliage wet longer, and creates a humid microclimate perfect for blight.
- Not Practicing Crop Rotation: Planting tomatoes in the same spot year after year allows blight pathogens to accumulate in the soil, almost guaranteeing future outbreaks.
- Composting Infected Plant Material: This is a surefire way to reintroduce blight pathogens into your garden next season. Always dispose of diseased material in the trash.
- Using Infected Seeds or Transplants: Always source your seeds and starts from reputable suppliers and inspect them thoroughly before planting.
- Not Sanitizing Tools: Moving from an infected plant to a healthy one with uncleaned tools is an easy way to spread spores.
- Misidentifying the Disease: Treating for the wrong disease is ineffective and wastes time and resources. Take the time to properly diagnose, perhaps with the help of a plant disease identifier app.
Conclusion
Tomato blight, whether Early or Late, can be a frustrating challenge for any gardener. However, by understanding the specific symptoms, the conditions that favor its development, and implementing a robust strategy of prevention, early diagnosis, and targeted treatment, you can significantly reduce its impact on your tomato harvest. Vigilance, good garden hygiene, and proactive measures are your best allies in ensuring a healthy, productive tomato patch. Keep a watchful eye, act swiftly, and you’ll be enjoying those delicious homegrown tomatoes for seasons to come!